Table of Content
- 1 How to install Nite Crawler Addon on Kodi
- 1.1 1- Launch Kodi on your device
- 1.2 2- Go to Kodi Settings
- 1.3 3- Select System
- 1.4 4- Select Add-ons
- 1.5 5- Enable Unknown sources
- 1.6 6- Select Yes
- 1.7 7- Select File manager
- 1.8 8- Select Add source
- 1.9 9- Select <None>
- 1.10 10- Enter the repository address
- 1.11 11- Enter the repository name
- 1.12 12- Select OK
- 1.13 13- Go to Add-ons
- 1.14 14- Select the Package installer
- 1.15 15- Select Install from zip file
- 1.16 16- Select the repository folder
- 1.17 17- Choose the repository zip file
- 1.18 18- Select Install from the repository
- 1.19 19- Select the Repository folder
- 1.20 20- Open Video Add-ons folder
- 1.21 22- Select the addon to install
- 1.22 23- Select Install
- 1.23 24- Select OK
In this article, I will guide you on the simple process of How to Install NiteCrawler Kodi Addon. The step-by-step method with images and screenshots provided below should complete your installation process in the easiest possible way. The installation process runs smoothly for FireStick, Fire TV Cube, Android TV Box, Windows, macOS, etc.
NiteCrawler Kodi Addon is one of the forks of the popular Covenant and Exodus after its complete shutdown. This Kodi Addon is the newest Kodi developed by JewBMX and ToneTone. The user interface is seamlessly curated with a standard menu list and there is a More Stuff section with a huge content library of HD movies, Podcasts, Kids Corner, Fitness Zone, Legends of Music, TV Reviews and Trailers.
After the massive shutdown of Kodi addons in July 2019, Nite Crawler has gained immense popularity. It’s currently supported by Jewbox Repo. So, I decided to post the installation process of Nite Crawler Addon for Kodi.
You may also want to check the best working Kodi Addons of 2020 for HD movies and a complete list of Best 2020 Kodi Addons for Buffer-free streaming.
Before moving ahead make sure you use a good VPN.
Your ISP and government monitor your internet activity. Streaming copyrighted content on any of your devices could get you into serious legal trouble.
Protect your IP address and remain anonymous online by using a trusted VPN. We recommend ExpressVPN as the #1 provider for FireStick.
ExpressVPN has the fastest speeds and unblocks geo-restricted content like US Netflix, Amazon Prime, Hulu, and BBC iPlayer making them our top choice for streaming too!
Click Here & Save 49% and get three months free of ExpressVPN
Read the installation steps below.
How to install Nite Crawler Addon on Kodi
Follow these quick steps to install NiteCrawler Add-on on Kodi-
- Launch Kodi on your device.
- Go to Settings.
- Select System Settings.
- Choose Add-ons.
- Select Unknown Sources.
- Select Yes to confirm.
- Go one step back.
- Click on File Manager.
- Select Add Source.
- Choose <None>.
- Enter repository address- https://jewbmx.github.io/
- Enter repository name- Jewbmx.
- Select OK.
- Back to Kodi Home.
- Go to Add-ons.
- Click on the Package Installer.
- Select Install from zip.
- Choose the Jewbmx repository folder.
- Select the repository.jewbackD-1.3.zip file.
- Go back and select Install from the repository.
- Select JewbackD repo.
- Open Video Add-ons folder.
- Select NiteCrawler.
- Click on the Install button.
- Select OK to download its dependencies on Kodi.
Now here’s a more detailed step along with pictures on How to install NiteCrawler Addon on Kodi. These will guide you through the steps with ease and you’ll be done in no time.
1- Launch Kodi on your device
Go to your apps list and select Kodi to launch it.
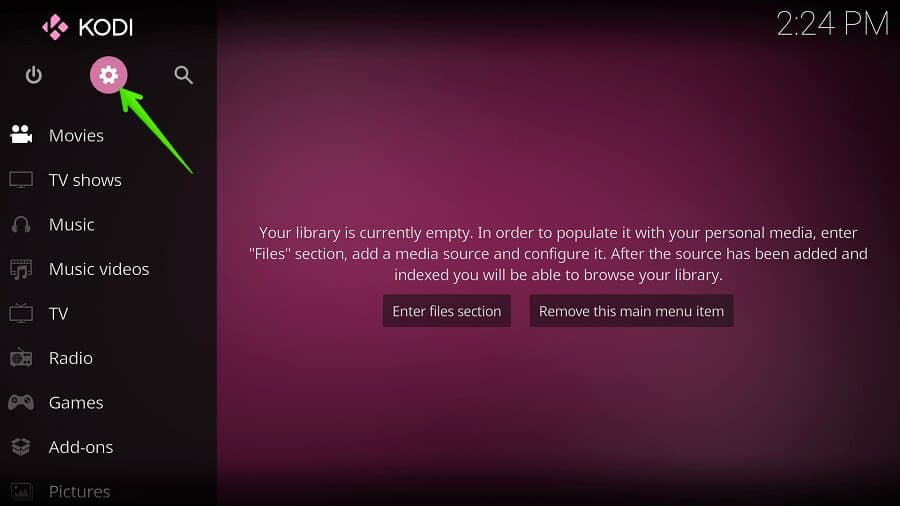
2- Go to Kodi Settings
Once Kodi home is fully loaded on your device, click on the gear icon to go to Kodi settings.
3- Select System
Select System option from the list of various options.
4- Select Add-ons
Select Add-ons setting from the options.
5- Enable Unknown sources
Click on Unknown source option to allow Kodi to install third-party add-ons.
6- Select Yes
A warning message will pop on your screen, confirm it by selecting the Yes button.
7- Select File manager
Go one step back and select File manager option to add repository source.
8- Select Add source
Here you require to add the source of repository address.
9- Select <None>
The default address is empty, click on <None> to enter the repository address.
10- Enter the repository address
Enter the repository address- https://jewbmx.github.io/ to install NiteCrawler Addon.
11- Enter the repository name
Enter the repository name as Jewbmx.
12- Select OK
Cross verify the repository address and name, then select OK button to save it.
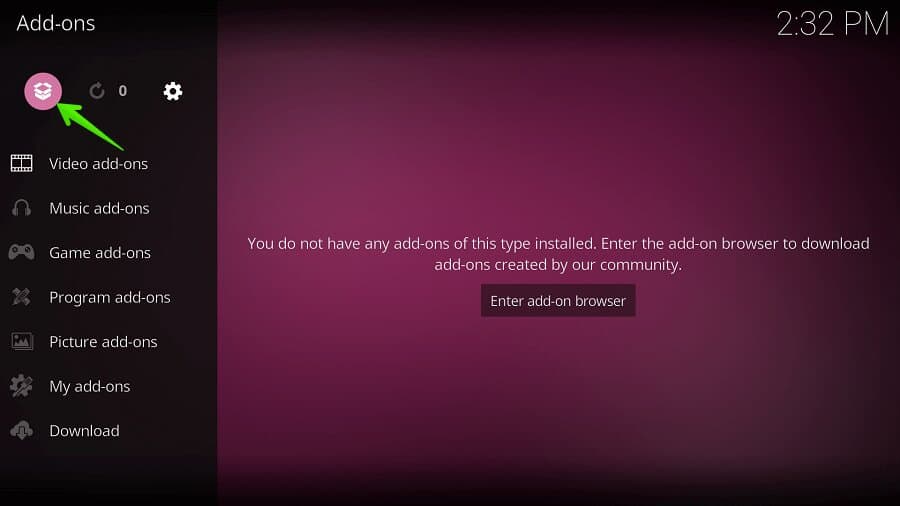
13- Go to Add-ons
Go back to Kodi home and select Add-ons option.
14- Select the Package installer
Look at the upper-left corner and select the Package installer option.
15- Select Install from zip file
16- Select the repository folder
Select the repository folder. Open Jewbmx folder to install the repository file.
17- Choose the repository zip file
Select a repository.jewbackD-1.3.zip file to install this repository on your Kodi device.
18- Select Install from the repository
Go one step back and select Install from repository option.
19- Select the Repository folder
Select JewbackD folder.
20- Open Video Add-ons folder
You can see various options like Music add-ons, Program add-ons, Video add-ons, etc. Select Video add-ons option.
22- Select the addon to install
You can see many addons available here. Select NiteCrawler to install on Kodi.
23- Select Install
24- Select OK
Some dependencies and modules will also be installed with NiteCrawler, just press OK to confirm it.
You’re done with the installation process. With NiteCrawler Kodi Addon, you’ll never run out on your unlimited streaming entertainment! Feel free to comment below for any suggestions. Cheers!
For more tech details, updates, and guides follow us at www.jailbreakfirestick.co